Expanding Communication

I am excited to introduce a guest blogger for the week, Margaret.  She has been working with identified adults in need of assistance on a day to day basis for the past few years and is here today to talk a little bit of how different ways of communication is essential.  Take it away Margaret!

Communication is essential to our lives and how we interact amongst each other.  Now please do not mistake “Communication” for “Speaking” as they are not mutually exclusive.  One can communicate with a look, a gesture, a word, or a machine.  It would not be correct or wise to conclude that just because someone cannot speak means they cannot express themselves.  Certainly there are those who may not express themselves fully or are in need some help from others in the process, but anyone can learn independently to share what they have to say with the world.

Take for example a young woman, whom I shall refer to as Amy, I have come to know quite well over the past couple of years.  She had learned over the years that her inability to verbally speak was a great way to have others communicate for her.  It was not that she was not expressive, but rather the opposite.  Though unable to formulate words other than  “huh,” “yeah,” and “mum,” she is adept to vocalizing, using her volume and tone to share pleasure or displeasure at any given moment, which many can find off-putting or confusing.  But, it is by her vocalizations that she is able to make phone calls with the people in her life, done so by having whoever is with her during the call relay every detail of the day to the receiver, to which that person on the other line would repeat these facts back to Amy for her to respond (often with great enthusiasm) to the various activities she participated in.  In public settings, Amy would often look to others to make statements or answer questions that were not a simple “Yes” or “No” question.  While having a limited vocabulary in a modified Sign Language helped her communicate some basic needs, such as “Help,” “Bathroom,” “Food,” and “Drink,” there was much to her that we knew she could be telling us.

Now, here I will share briefly one practice being used for people in similar situations who cannot speak or speak clearly, which is facilitated communication, or the assisting of an individual who is typing or spelling out words on a computer, iPad, or Alphabet Chart that he or she wishes to say. 

Marpic1

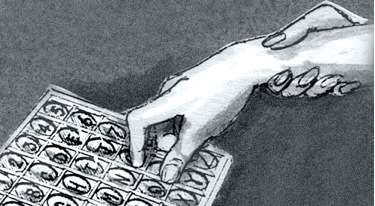
A controversy with this method is the misunderstanding that the person facilitating this is guiding or forcing the particular letters to be typed while holding onto the arm of the one typing, so what is being said are not the true words we are meant to hear.  Having been trained in directing and utilizing facilitated communication, I can assure you that the image above is not accurate as to how one approaches.  The person who is typing ideally knows how to type and what they want to type, and will actively reach for the correct letters necessary for a word they need or want to convey.  Oftentimes, this individual may have difficulties processing and need to “reset” before they reach out to hit another letter.  This is where the facilitator uses their hand as a support (using the palm of our hand and not gripping as the photo indicates) to hold back the arm in order for the one typing to stop and think about what letter it is they need to press next, so that they may proceed and reach out to select the correct letter.  When this “reaching out” occurs, the person supporting does not actively hold back or push forward the hand to try and control what is being typed.

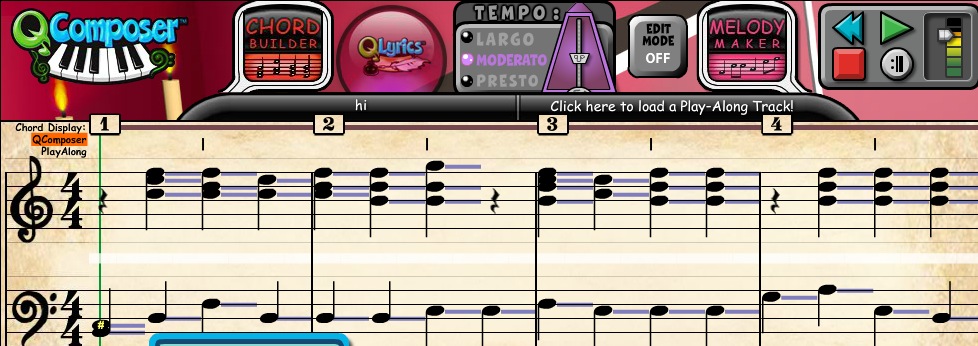
Now that I have gotten that out of the way, due to Amy’s fine motor skills, or lack thereof, typing out letters to spell proves to be a difficult task, as well as being able to differentiate some of them by their appearance.  Because of this, the above form of facilitated communication would actually further limit her ability to communicate.  Instead, we have had the pleasure of using a wonderful program for the iPad called Proloquo2Go (unfortunately not a free application when used for its full potential), and we have given her a voice that she can control.  Using images to represent a word or phrase, we have given a source of ways to express needs and wants to anyone, and not just those of us who knew her enough to recognize her vague vocalizations and modified signs.

Marpic2

The success of this program has been made very clear when, after a wonderful and very new trip down to Florida, we gave her a series of phrases that simply described what she did during this vacation.  Then while on the phone with someone, she was able to say “I went to the ocean for the first time,” or “I rode on the Big Thunder Mountain Railroad” or “I stayed at many hotels” without needing others to speak for her.  Through this device, she has found her voice, and found how receptive people can be when they are able to respond directly to her.  There is no greater joy than seeing someone so lost in her “learned helplessness” (ie letting others speak for her) discover just how communicative she can be.

Thank you for sharing your expertise Margaret!

Ready..Set..Engage!

Have you ever walked into a school lately and really taken a good look at the expression on a teachers face? Normally one would say it is a look of utter exhaustion! With the piles of paperwork, IEPs and 504s to follow, state tests, evaluations, grades, behavior issues, professional development, and whatever else is going on that day one would be shocked if we had time to teach a lesson! The time that is spent running a classroom takes up a lot of focus and time that could be spent truly educating and engaging what we hope are soon to be lifelong learners sitting in the seats in front of us.

I have been told that what makes good classroom management is not only the ability to command respect and lead with a fair mind, but also to be able to completely engage the students with every important concept I teach. I recently read a book entitled Teach Like a Pirate by Dave Burgess (Yes, I thought it was literally going to be about Pirates but it was still very interesting!) This book got down to what truly can engage a student in this 21st century learning atmosphere reminding the reader what it takes to keep them interested from the time they walk in to the room until the time they walk out.

Passion- It truly is all about the passion. You wouldn’t be teaching if you didn’t have passion for educating the next generation. In order to truly engage your students they need to know that your passionate about it too. Emanate confidence about the subject and how much you love it and it will radiate around the room.

Raport- The most simple thing to engage is a student is to build a connection. Many times I have had a student stop by my room just to tell me how their day was, in my class a way I build that connection is to use music they listen to on the radio in class. Some teachers will give me a funny look when I say this, but I make it work even if I have to spend some time changing lyrics and editing audio to make it work. Just like an actual couple relationship, each side has to put in effort to make it work.

Asking the Right Questions- You can never ask too many questions!  Asking the right ones that will provoke a deeper thinking and the want for self discovery will engage your students. Sometimes I like to think that their brain is asleep when they walk in school in the morning, it just takes the right questions to wake it up and begin the learning. Ask a question as soon as they enter the room and keep the gears running all day long.

Enthusiasm- I remember that scene from Ferris Bueller where attendance is being taking and Ben Stein is taking attendance. That voice just makes one want to go to sleep, imagine if you had a teacher who talked like that too? No enthusiasm, there is a reason why students fall asleep in class. Even if you have to fake it for a day, be excited about what you teach! (There is a reason why most teachers are caffeine addicts!)

Hooks- Having the proper hook to get your students interested makes all the difference. This book is the ultimate guide to catching their attention from minute one of class. From the movement hooks to the acting to the technology and even the questioning, you will find the right ones for you in here.

Pirate Crew- Arrr need help? Need support? A little too shy to do this on ye own? Form a crew of goofy scalawags to join you in your journey to be the wackiest and most engaging teacher in the building!  I’ve gone through it and so can you!

    This book was the silliest and best teacher read I have gone through in a long time. With the tricks in Teach Like a Pirate and the book Teach Like a Champion my classroom is quickly turning into a popular space!

IMG_0124

What kind of hooks do you use to engage your students? Have you ever read this book before?

In The Spotlight!: Music in Movies

Lately I have had movie music on the brain, playing the Theme from Jaws at random times, listening to movie soundtracks, and occasionally bursting out into song from my favorite motion pictures. We tend to hear these epic soundtracks to our Hollywood made stories everywhere and everyone  young and small knows what they are and where they come from. My thought is how would we teach this to our younger students? This teaching process has already been mastered by the music tech greats at the higher level, how would we simplify those activities so elementary students could enjoy learning the sounds from movies they hear so often.

Three things movie music can teach:

  • How music in a certain moment can affect ones mood or emotions
  • Story telling through sound
  • Relation between music and movement

Now what sort of activities could you bring to the classroom to teach them?

Playing Movie Music – With Joytune’s new movie music pack myself and my students can enjoy the music of John Williams all the time. It might sound too hard for younger students but when you simplify it down to just the main theme, younger students can enjoy playing movie music on classroom instruments.

Storybook Soundtracks- Movies are just live stories, take a storybook and turn it into a movie. Have your students read it, draw the pictures, do the foley art and create the background track.

iMovie Trailers- Each genre of movie has it’s own distinct sound. Have your students easily create iMovie trailers using the iMovie app on the iPads to go along with the music. Once they are done, have a movie class and bring the popcorn!

Foley Artists– The art of foley, teaching the students the true art of sound performance before all these big fancy sound machines came. It is a great lesson for sounds of found objects.

Make your own music- Cut out the sound and have the kids put the voices and music in themselves using garageband or audacity.


What sort of ways would you teach younger students how music from movies works?

IMG_0043

Drumming for Positive Smiles: A Last Week Lesson That Will Last

I truly have tried to turn a hugely devastating memory into positive energy this past week. I’m just one of those people that won’t take failure at an option and the easy roads in my life always seem to be closed so like most, I always am faced with driving through the challenging paths. When I need to just feel right again I usually turn to drumming, so that is what I focused on this week for lessons with my students to let them leave my classroom with smiles, and a lasting memory of leaving my classroom feeling good and loving music.

We used rhythm sticks for most of these activities and did our drumming on the carpet (I’ve got some strong 5th graders who could break my sticks in a second if played on a harder surface!)

We started with a few games and activities from drum circle guru Kalani .

I used the following games out of his book Drum Fun:

  • “Where’s Froggy?” – A cute hot and cold game that my students were absolutely gaga for.
  • Drum Call- Gets the students warmed up to play and listening to the numbers you call out. Is also a great way to throw leadership to a student who normally will not speak up.
  • Rumble Ball- I get to play with a playground ball and have my students experimenting with sound, I dare you to find a single thing wrong with this.

These games had the students in stitches from laughter, especially when my frog from Where’s Froggy was hidden in some hilarious spots!

IMG_0343

After the games we decided to spend the last 15 minutes or so drumming, just drumming that simple. I went over a simple rock beat with them and chose two songs from my KidzBop playlist for students to use that rock beat to play and sing. It truly was a surreal moment being able to sit, listen and watch this go on as I played right along with them. Most classes got into it, singing, grooving in their seats, and drumming on the carpet so hard their hands hurt after it was all over but begged for more. Its that feeling right there that you want walking away from a class like this, being able to just get lost in the music around you and letting out all of that anger or bent up energy screaming to get out, eventually taking with you the emotions of peace and comfort.

The last song that pretty much ended my time with a class was the KidzBop version of “Some Nights”. Most know of the killer drum beat in the song that you would normally think elementary school students would not be able to do but I found by simplifying the beat into “Te Te Ta TicaTicaTica Ta” or for some classes I went down even further to “Te Te Ta TicaTica Ta” and turning it into an ostinato that went to a steady drum beat when the drums were absent from the song. It was a fantastic ending to class and left them smiling and singing at the top of their lungs. The link below is to a few recordings from a few of my classes performing this:


Venturing out for a Safari

This has been one of the roughest weeks of my life. It got to the point where I truely felt numb from the reality around me because I just could not handle it at the moment. Thanks to good friends and supportive members of my PLN who have given me some confidence in myself again,  I am spending the weekend rebuilding my psyche and preparing for my last week of the year at my current school. It is time to truly in a matter of speaking go “balls to the wall”. I’m going to the leave this school for the year with truly no regrets. I plan on spending a lot of time outside, I plan on making lots of noise, and I plan on just making sure to leave these kids with a lasting love of music. 

I’m sort of using this post as an excuse to lesson plan this activity out, so bear with me if any mistakes come up.

 Materials:

  • Plastic empty easter eggs
  • Decorations for the eggs
  • Markers
  • Basket for found eggs
  • Clues
  • Signs
  • Map of instrument families

Procedure:

  •       Our precursor to this is that we have been working on the Young Person’s Guide to the Orchestra listening adventure from Carnegie Hall http://listeningadventures.carnegiehall.org/ypgto/index.aspx .
  • Before your class comes, find 4 secure places outdoors on the playground or inside that have good hiding spots for your eggs and hang up a sign labeling each of the 4 areas: Woodwind Pond, Brasslands, Percussion Paradise, and String Savannah.
  • Decorate your eggs to look like the little monsters from the adventure (I’m using markers, paste on eyes, and feathers) and label it with a name of the instruments on your hunt. Place a clue to the next instrument inside the egg and a little “You found me!” slip with the picture of the instrument. My clues are:

Flute-

   I like to hang around with a lot of my friends near the pond, I have no reed but I’m still where I belong. Musicians play me while standing straight and tall, I sound the second highest of them all.

Oboe-

     I’m black and look a lot like a clarinet but I’ve got a reed a lot like the bagpipes that helps me play when wet. 

Clarinet-

       I can play waaayyy down low to waaayy up high. My flat reed helps me make all of my friends at the pond jealous with the range of notes I can blow.

Trumpet-

         A musician buzzes into me to make sound. I’m the highest gold looking instrument to be found.

Trombone-

         There was a song made that sang about 76 of me. My slide  that goes up and down makes my notes stay  on the beat.

Tuba-

         I’m the lowest instrument in the Brasslands that can be found. I can be found a lot in a band that marches around.

Cello-

          I’m one of three instruments in my family that have to sit on the ground. Using a bow or fingers, a musician can make my sound.

Violin-

           A musician plays me by putting part of me under their chin. Playing me with a bow or fingers, everyone wins!

Harp-

             I am the old lady of my family standing as tall as a room. My beautiful melodies made with my many strings can make anyone swoon.

Snare Drum-

               Rat-atat-tat goes my sound when a musician taps me with sticks. I’m a snare with great tricks.

Timpani-

           Rolling on me can sometimes sound like thunder. There are usually 2 or 3 different sounding versions of me in an orchestra. 

Xylophone-

             I have bars on my body and can be played with many mallets at once. My name begins with a letter of the alphabet absent from many words.

  •  After all of the eggs are ready, go hide those eggs around each of the 4 sections. Make sure they stay in the proper section though, trumpet in the Brasslands, Oboe at Woodwind Pond, etc.
  •  Once students come in and get settled,ready to go on to the next section of our adventure. I will calmly break it to them that the adventure is BROKEN! (oh noes!) but Uncle Ollie left us a note

   Oh my Safariers! I thank you for all of your help from afar. Our communication line is broken! I am still in need of your help to round up my instruments! Are you ready for some fieldwork?

~Uncle Ollie

  •  Have a map of the 4 areas for students to look at to know where to go and have their first clue ready that will lead to the first instrument in egg form. Let the kids lead as much as possible.
  • After the hunt is complete, I’m going to have an orchestra seating map I have traced from the adventure ready for them to color.

carnegie_young_persons_guide

What activities do you do outside for music class?

The Save Button: Turning a Small Activity into an Epic Masterpiece

screenshot_104

      Often to satisfy Bloom’s taxonomy during the teaching of a concept we tend to go through many activities to satisfy every type of learner in our classroom. Something I have seen myself doing on more than one occasion is having my classes do a small activity that really leads to no where other than showing me they know how to make a melody or the difference between a rest or quarter note. I have a really big belief that in order for my students to best understand music is to make their own so we tend to do a lot of small composing activities. 

      I changed all those activities up for my 5th graders this quarter. It was around digital portfolio time a few weeks ago and I had nada. So instead of doing a repeat of projects in the past or an activity that did not lead to much more than a reinforcement concept. I went with a new idea of Step by Step songs.

screenshot_106

          You could do this with whatever notation software you have. I decided on QComposer in Quaver music because it was easiest for me. Our build up from beginning to end was:

  • We started with a simple melody line on the treble clef. They were given specific expectations to do this.
  • The first step included only quarter notes and rests, I then had them substitute some of those notes for eighth notes.
  • We learned about the bass line next! We added in the same note that was on the treble line to the bass clef line.
  • Chords were our last step. Since we still were shaky on the bass line, the 5th graders put their chords on the treble.

Each step was done one class period at a time and students saved their work after each step. 

I told them we were adding layers and like Rome, good music wasn’t built in a day.

After they are done each student is submitting their work to me in the Quaver teacher admin panel. I’m getting some great work and next week we get to finish with reflections for their portfolios. The best part about this whole thing is that they understand composition on a deeper level now and I get to thank the save button for it!

screenshot_107

Wanna See My Wall?: Pictures of My Student Made MIOSM Statement

In my previous post (Center ideas for MIOSM) I talked about the posters and poems my students were going to be completeing this week. I am here to report, we did it, and with great joy I can proudly say it has become a true statement in the school. Hundreds of poems and posters promoting why music is important to my students. It is a sight for music advocates eyes. I’m very proud of it and the notice it has gotten from other teachers. I plan to keep it up for another 3 weeks until I switch schools one last time for the year. Next week I will be adding the last unexpected part to it, my Kindergartners and 1st graders actually WHINED because they wanted to do this as well so I will be doing a shared writing with each of those classes and adding on!

Instead of just bragging about my wall I decided it would be best to just show you, a picture is worth a thousands words, right?

A link to a video tour of the papers covering my hallway walls:

My Walls

From the mouths of my students, why music is important to them:


IMG_0093 IMG_0094 IMG_0095 IMG_0096
IMG_0098 IMG_0099 IMG_0100 IMG_0101 IMG_0102 IMG_0572 IMG_0104 IMG_0105 IMG_0106 IMG_0107 IMG_0108 IMG_0109 IMG_0110 IMG_0111 IMG_0112 IMG_0113 IMG_0114IMG_0549 IMG_0115 IMG_0097

IMG_0116 IMG_0117
IMG_0119 IMG_0120 IMG_0121 IMG_0122 IMG_0123

Have you ever asked why music is important to your students?

Center Ideas for MIOSM

This week as I jumped into hyper speed mode trying to get adjusted and back into the swing of things. I felt so lucky looking at my plans and quarter outline for next week and seeing the words CENTERS in big beautiful letters. Being it Music in Our Schools Month I decided to throw a little something extra into this round. After reading a few blog ideas, spending some time on Pinterest, and checking out the NAfME www.nafme.orgwebsite I got some ideas. One is a writing activity and one is a drawing activity that I will be putting up finished products on my hallway wall in order to create a really cool ‘why we love music’ wall that all passerby’s can take a gander at as they walk up and down our hallways.

The beginnings of our wall. I added a title and some inspirational quotes.

The beginnings of our wall. I added a title and some inspirational quotes.

Music Poster:

Materials-

  • Coloring Materials
  • Index card with directions
  • Blank paper

Directions-

I want you to draw me a poster describing why you love music to a person who has never seen music class before. Tell them why it is important to you and what you particularly enjoy about class. Remember to draw a picture along with your writing.


What Music Means to Me:

Materials-

  • Coloring materials
  • What Music Means to Me sheet- Worksheet
  • Pencils

Directions-

Write me an acrostic poem using words that describe why you love music. Use your best words and remember each word must begin with one of the letters in the word Music. You can color and make it pretty after.


After-

Hang these up activities up in the hallway for all to see.


What are you doing to celebrate Music in Our Schools Month?

iPad Apps; To Use As A Whole and To Use On Your Own

It is a short post this week, I was asked to head on down to Boston this weekend to work for some pretty awesome Quaver people. It has been a great day hanging out with Rob, Bradley, and Buzz telling all of these Massachusetts teachers about the program while we all laugh and have a great time. Tomorrow I get to drink a pitcher of coffee (I’m trying to be as caffeinated as Mr. Quaver) and go present at the Quaver session! I’m extremely excited to go share what I do with the program with others!  

This week I’ve had iPad on the brain trying to figure out cooler ways to use the device in my classroom. We all go through that conundrum, a great resource lands on your desk that looks AMAZING..but..how do we use it? It seems a running theme as iPads slowly make their way into the educational world. Starting to figure out what can be used where is the new battle that is appearing. Below are two categories with 3 apps under each. 3 that are amazing to use as a whole class, and 3 that work fabulously with small group or individuals (great for centers or small group activities if you have access to multiple iPads)

For the Whole Class:

  • Dolce Music Flashcards – $2.99 https://itunes.apple.com/us/app/dolce-music-flash-cards/id289772371?mt=8  This app is great for a quick review game. I put it up on my projector and students will raise their hand to answer the question. It tracks how many you get right so the class can set goals for themselves!
  • Moozart- $1.99   https://itunes.apple.com/us/app/moozart/id405194870?mt=8 Teacher melodic contour or up and down? This app is fantastic. Using barnyard animal sounds to compose simple melodies or choosing already made melodies the younger students get a kick out of hearing different sounds and can understand the concepts that you are trying to get across!
  • Recorder Master- $1.99 https://itunes.apple.com/ca/app/joytunes-recorder-master/id492065346?mt=8 Made by Joytunes this app is constantly requested in my recorder classes for a fun activity. The students learn more about breathing and tonguing from trying to drive the plane or kill the birds than they do from me just demonstrating it!


For Small Group or Individuals:

  • Garageband- $4.99 https://itunes.apple.com/app/id408709785 This app can technically go for whole group as well, but I prefer in smaller or individual. I have done many projects with students that have produced amazing products. This program records, allows students to jam on iPad instruments, and even allows them to mix premade loops together to create fantastic music. This app gets students creating and improving.
  • Pocket Wavepad- Free https://itunes.apple.com/us/app/pocket-wavepad/id395339564?mt=8 So impressed with this app, I have begun to use it for recording everything my students do in class. It is so easy to maneuver that my students can use it themselves. I give them opportunities to be able to create music, go to a quiet place, and record. Recording is a skill I feel students need to learn.
  • Dustbuster- Free https://itunes.apple.com/gb/app/piano-dust-buster-+-valentine/id502356539?mt=8 I love using this app with my private piano students. I have seen true results from my students who have downloaded this at home on their iPads and come back to me being able to play songs from it BY EAR. My piano students use a real piano with an app, and I can use the app during center times or as part of our tech zone.


If you’re at MMEA, come see the Quaver crew and I at our session at 11:30! If you’re not, check these apps out and let me know what you think! 


IMG_0318

Composing using QCreatives

After a week in amazing San Antonio Texas presenting and attending TMEA I came back ready to get through our last week before February break. I tried a few new things this wonderfully hectic week which included learning composition and performance of rhythms and melodies. I focused on 2nd and 3rd grade for the following below with each ending off with an ‘A ha!’ moment for my amazing kiddos!

QComposer (2nd grade):

Materials:

  •    QComposer up on the projector
  •    Whiteboard and Markers
  •    Xylophones and mallets
  •    Recording device

Process:

  •    Our precursor to this is learning the rules of what makes a good melody. We review them and write them on the board.
  •    We choose a starting note and I then go around the circle giving the students the option of going “up or down” to the next line or space. We use only quarter notes and always start and stop on the same note.
  •    We listen to it and using whiteboard markers we label the letter of the notes together.
  •    We clap to the beat and say each letter name.
  •    Our last step is to practice each measure on the xylophones and put it all together. The students were so proud to play their own work!
  •    If it sounds great and the students are focused I would head to the recording device you have and get it recorded! The teachers love to hear what their students are working on!

IMG_0087

QBackbeat (3rd grade):

Materials:

  •    QBackBeat up on the projector
  •    Whiteboard and Markers
  •    Rhythm sticks and a rug

Process:

  •  This was another activity as my students explored what percussion is all about.
  •  First, all you will need in QBackbeat is lines 1 and 3 (I called them the red and green beats)
  • Together I asked students what they thought a slow steady beat would look like on the red line. We ended up filling every other space until it filled the screen.
  • Next we practiced the beat using our voices with the word “Boom” acting like a bass drum and practiced saying “Boom” together as a class.
  • Next we added a green beat and I did this on my own as students watched because we are still working on eighth notes. I created the eighth beats in QBackbeat by clicking each box twice. The students wanted to say this beat as slow “Ticka Ticka” so we practiced saying this all together.
  • Next we divided the class in half, half said the red line beat and half said the green line beat before we switched parts.
  • Passing out the rhythm sticks I had them all sit in a horseshoe shape around the rug and we practiced each line saying and playing as one of my students pointed on the board.
  • Then we divided up the class again and each played the red and green lines together and after switched parts.
  •  I began playing the two lines at once as the class listened intently. After a minute one of my ‘chair drummers’ shouted out, “Hey! That’s a rock beat on the drum set!” I nodded my head with a grin and mouthed ‘try it’. They were so pumped I listened to the sweet sound of floor drumming for a good 10 minutes. All they needed was QBackbeat as a visual!

IMG_0089

These lessons were used both this week to great success and grabbed student’s attention right before break!